Vi använder cookies för att ge dig den bästa upplevelsen av vår webbplats.
Vissa cookies är nödvändiga för att rcflyg.se ska fungera och de har redan sparats på din dator, dessa innehåller:
-Senaste aktiviteten
-Senaste besöket
-Sessionsdata för PHP som webservern behöver
Genom att fortsätta använda rcflyg.se och inte aktivt stänga av funktionen i din webläsare godkänner du att webplatsen sparar dessa sessions data i en cookie. Dessa raderas när du stänger webläsaren.
Har du inte hört att man garanterat blir av med samtliga störningar om man klipper kabeln? Sedan läste jag att det var det bästa sättet att undvika sk Naza-fly-aways.
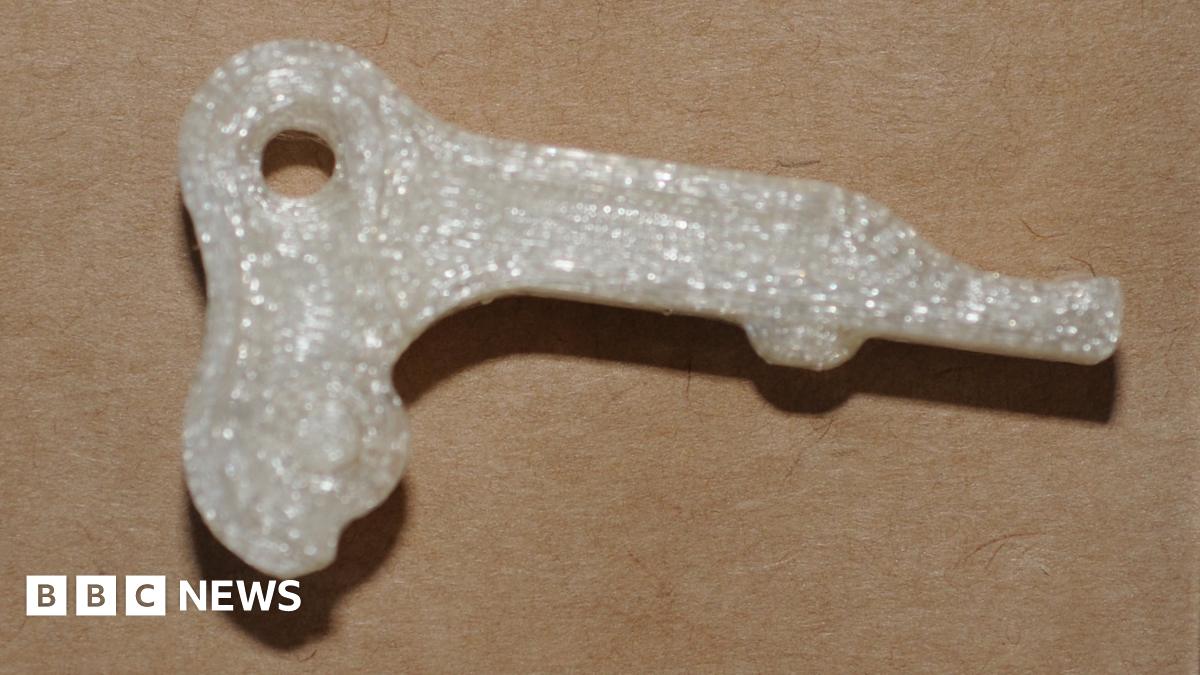
Wingjoiner to attach wing panels with O-rings. It works very well to secure the RVJET wings and wing extensions using 3/4" x 15/16" size O-rings. For a more aerodynamic install it is recommended to cut out where these are placed. Either by freehand or with the user of a joiner: http://www.thingiverse.com/thing:127067 Installation: http://www.rcgroups.com/forums/showpost.php?p=24931069&postcount=497 This wingjoiner is designed to be printed using FDM 3d-printers (Solidoodle, Makerbot, Reprap etc). It has the same outer dimensions as the roiginal Dhook wingjoiner but a more robust construction The original Dhook-wingjoiner was originally designed for injection molding and wasn't really optimal for 3d-printing..I've made some revisions but I have not yet decided which version that works best since my printer is currently off-line. Rev A - First revision since the Dhook and is designed primarily for FDM-printing. This has been test printed. Rev B - I opened up the design to more easily access the O-ring since it was a little too tight in rev A. This version is shown in the rendered pictures.
Det finns två varianter, revA och revB. I revA blev det lite för pilligt att få loss O-ringen så revB är lite ööpnare i sin design på bekostnad av eventuellt lite svårare utskrift om printern inte är bra inställd pga de överhängen. Men jag tror att de flesta borde kunna skriva ut revB med bra resultat ändå.
Ja, alltså artikeln handlar ju egentligen inte om några eventuella vapen man kan skriva ut. Den handlar om hur poliser har beslagtagit någons 3d-printer och några utskrivna reservdelar. Anledningen är väl de rätt fåniga artiklar som har skrivits om utskrivna vapen har fått som resultat att poliser agerar mot bättre vetande på ett rätt så anmärkningsvärt sätt.
Separated the model into 3 main pieces to minimize any warping issues and negate the need for any support. Added dowels for the internal parts. Single plate printing. Fits together perfectly. Just glue the 3 main parts together and place the internal parts. Dowels slide in nicely, but still allow easy removal. HOW TO PUT IT TOGETHER: A YouTube streamer posted a great video of his print of this and detailed assembly instructions. Assembly starts at about 6:15 or so. https://www.youtube.com/watch?v=dt6IdCPctu0.Remixed in Tinkercad.comhttps://tinkercad.com/things/58ME1FhYSL7-rubberband-gun-all-pieces-single-plate
This week I decided to build a full functioning bear trap based on images found on Google. I worked out in theory how the mechanism should work for the trap, and then spent hours CAD up the parts to fit together nicely with the right tolerance, so the springs and latches will work smoothly. Result? The teeth bite FAST! The only downside of printing with ABS is that the 2 side arms break after me playing with it too many times. No worries though. I've designed it the way so they can be easily replaced with new springy arms. Next lot I'll print them with rubber-like ABS. That should last me a while! Caught a finger - https://www.facebook.com/photo.php?v=10151863634711004 Caught a banana - https://www.facebook.com/photo.php?v=505942579476680 *UPDATE - new STL files have been uploaded with minor adjustments on tolerance and build plate arrangement.
Note: Due to inherint flaws in this design, I developed an alternative modular cooling system for the Prusa i3 that can be found at http://www.thingiverse.com/thing:230654. I suggest checking it out before you make one of these. This is a dual 40mm fan filament/J-Head nozzle cooler for the MakerFarm Prusa i3 with an MK IV J-Head hot end and a Greg's Accessible Extruder, although it should work with most Wade's/Greg's extruders using the MK IV J-Head. It provides 330 Degree cooling of the filament. One fan is dedicated to cooling the J-Head, the other is dedicated to cooling the filament. I have added a mirrored version of the DualFanFlowDirectors360.stl file, to allow the use of 40mm X 40mm X 20mm fans for filament cooling in place of the 40mm X 40mm X 10mm fans, since they were previously obstructed by the extruder stepper motor.
MVH/Christer
Bättre lite skit i hörnen än ett rent hellvete:stupido2:
Det är vinghängare så jag får upp lite vingar på väggen.
en sista minuten ändring gjorde jag och tänkte fel , minskade hålen för vprören med 0,2mm istället för att
öka med 0,2 mm vilket gjorde att hålen är ca 0,2 mm för små :banghead:
Testade att pensla byggplattan med en abs/acetonblandning, lite sitter kvar under modellen men funkade riktigt bra, hade bekymmer att få loss bitarna
------------------------Skickat från min Texas Instruments TI99-4A ---------------------- |FPV STUFF| |FATSHARK Dominator HD & BASE SD| |RiteWing Zephyr II | X * 2X0 Quads Naze32| | DJI Inspire 1 | |TERMIK OCH HANG |
|Polaris DLG | Twister3 DLG|Arctus DLG|Daidalos 2500|DSF Hangking| |FPV4FUN @ Youtube |


Kommentar